On October 1st I started on my efforts toward creating a set of Makerspaces in our school district. I immediately jumped into visiting the d.school at Stanford, collecting every book I could on the topic, and applied to attend the FabLearn conference. A Makerspace has been my goal since the first day I started as STEM Coordinator last year, so when I was recently given the flexibility and permission to move forward, I jumped on the opportunity immediately.
Now, what I’m going to lay out here is my vision, supported by numerous individuals, conference sessions, and books. I’ll include a list of resources I’ve referred to at the end. When I’m finished, I’m hoping you’ll have a good idea of what I’m doing and can give me some great feedback – be it the programs we use, companies I should reach out to, or something I need to fully rethink.
First of all, the vision and mission of the Makerspace Collaborative:
Vision
All sites will have access to a Makerspace where students can work together in developing STEM familiarity and competency through after-school 2-week Introductory (Level 1) courses and 2-4 week Advanced (Level 2+) courses, along with lunchtime clubs meeting once or twice a week. These courses and clubs will include coding, robotics, and making/design thinking.
Mission
Across all sites, at least 700 kindergarten through eighth grade students engage in Introductory (Level 1) courses in coding, robotics, and making/design thinking or lunchtime clubs per year. Engage at least 100 students per year in Advanced (Level 2+) STEM courses.
How do I plan to get there?
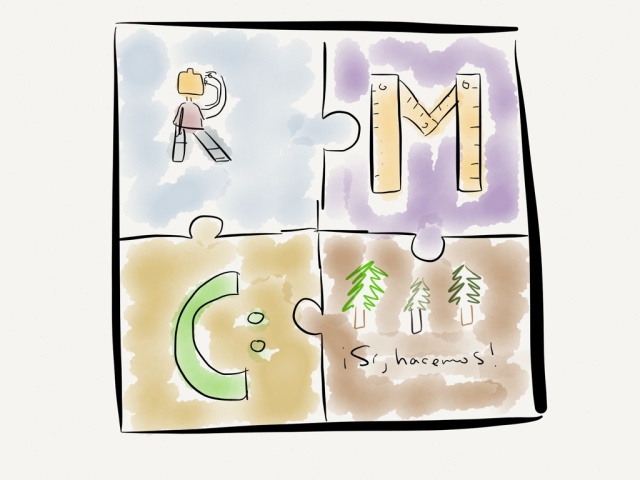
Students who complete all three Introductory courses will earn a badge (puzzle piece pin in lower right-hand corner) that will connect with the Advanced badges (puzzle piece pins – R(obotics), M(aking), C(oding). Advanced badges do not need to be earned consecutively or in a particular order.
The Makerspace after-school programs will run in approximately 8 week cycles, beginning with an “open house”, followed by 2 week courses in making/design thinking, coding, and robotics. The cycle will conclude with a celebration/reflection the following week.
Instruction for courses will come from:
- Coding – Code.org, Tynker, Kodable, Turtle Art
- Robotics – Lego WeDo, Lego Mindstorms, Thymio
- Making/Design Thinking – Institute of Design at Stanford, Make Education Initiative, RAFT, FabLab@School
Lunchtime clubs will be for students in all grades and there will likely be some overlap with nearby grades. Clubs will all be student choice and may include Legos, 3D printing, e-textiles, video production, Scratch, or whatever kind of making they’d like!
Cycle:
Open House – January 7-10th
Making/Design Thinking Level 1 course – Jan 13-24th
Coding Level 1 course – Jan 27th-Feb 7th
Robotics Level 1 course – Feb 11-28th
Celebration/Reflection – Evening in week of March 3rd
Timeline:
2013-2014: Build Makerspace and create pilot introductory and extended STEM opportunities at one site, supporting students from that site and other nearby campuses.
2014-2015: Implement full introductory and extended STEM opportunities at first site. Build Makerspaces and pilot introductory and extended STEM opportunities at two other school sites.
2015-2016: Full introductory and extended STEM opportunities across first three school sites. Build Makerspaces and pilot introductory and extended STEM opportunities at all remaining school sites.
2016-2017: Full introductory and extended STEM opportunities across all school sites.
While I am going to run the pilot Makerspace this year to work out all the kinks and make it as powerful as possible, my goal is to recruit Maker Corps or some other Americorps organization to staff each Makerspace in future years. Eventually, this funding will come from within the district, though at this point we will rely on outside support, along with all the materials for students to use.
Layout:
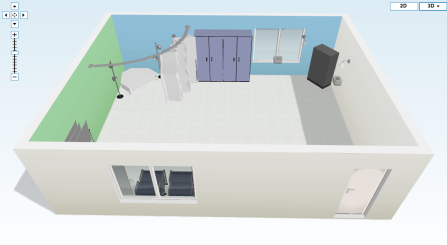
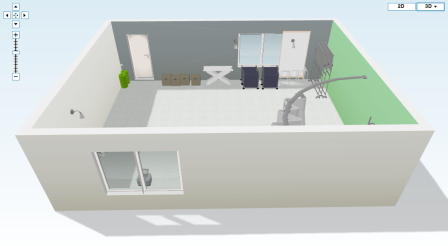
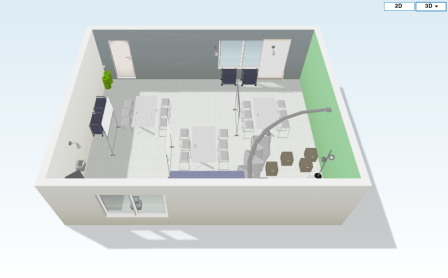
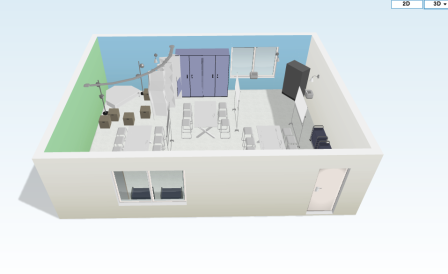
What will the Makerspace look like? Well, I’ve created this mock-up of the room in reset mode and one way it can look while in use.
But, to be honest, that’s a huge dream. Right now the room looks like this:
I’ll be shopping around for support, that’s for sure, but even without any additional support I’m still going to open up the Makerspace by January. As Sylvia Martinez and Gary Stager say in Invent To Learn, “We owe it to our students to close the digital divide immediately and offer expanded learning opportunities.” I have a box of Legos, a few old MacBooks, and a brand-new Thymio robot (you can find it at Techykids.com). I can also pick up a button-making kit easily from a craft store in order to make cheap pins. Just that, along with the right prompts and support for the students, is all that’s really necessary. Everything else will just help make it more powerful and give students multiple entry points and materials for creating.
All of this work has come together after a lot of reading, listening, and observing. Here’s what I’ve done so far and what I plan to do before opening the first space:
Reading
Make Space by Scott Doorley & Scott Witthoft
Invent To Learn by Sylvia Martinez & Gary Stager, Ph.D.
Makerspace Playbook: School Edition by Makerspace.com
Young Makers Maker Club Playbook by YoungMakers.org
The Maker Movement Manifesto by Mark Hatch
Creating Innovators by Tony Wagner
Listening/Observing
Don Orth & Christa Flores – Hillbrook School’s iLab
Heather Allen Pang, Angi Chau, and Diego Fonstad – Castilleja School’s Bourn Idea Lab
Nate Rinaker & David Malpica – Bullis Charter School
Aaron Vanderwerff – Lighthouse Community Charter School
Christine Mytko – Black Pine Circle School
Amy Shelley & Katie Kinnaman – Garner Bullis School
I’ve also talked to or hope to talk to the Maker Education Initiative, RAFT (Resource Area For Teaching), TechShop Menlo Park, Watsonville Science Workshop, TechyKids.com, FabLab@School, d.School at Stanford, The Tech Museum, Recology, Menlo School, and as many other teachers/makers/companies/schools/organizations as possible.
Any thoughts? Suggestions? Am I completely missing something?

This is fabulous! I, too, am trying to create a MakerSpace. However, mine is on a much smaller scale – 1 classroom in my school. There is not a lot of info specific to elementary school MakerSpaces out there, so I am thrilled to find your post!
Glad I could be a resource to support. I definitely will continue to share and would be happy to talk about how this could apply to your classroom.
I appreciated your post on the Makedo. I just heard about it last weekend and am excited to bring them into our space.
Thanks! I hope you will continue to blog about your progress!
Thanks for sharing these resources. I will enjoy watching this come together. I need to learn more about wego.
Happy to share. And I need to learn more about all the robotics kits… that’s definitely my least experienced area.
Robert, bravo for your big plans. I love that you have long term goals. Excellent! I would love to be in a school like yours that sees the importance of this kind of learning. I am a total novice, but I do have a Diigo folder called Makerspace and I’ve been reading a bit. I added your post to my other resources. I appreciate the reading list too–I’ve read just two of those books.
I do have a series of questions, though. Your makerspace is heavy on technology. Will you also have messy materials? Do you see the two co-existing in the same room? (Your room does look large enough.) I would like to have a makerspace that had programming, legos and robotics, but also sections for hands-on working–with cardboard, wood, scrap materials. Also a place to cook, paint or really whatever kids wanted to tinker with and make. Is that the making/design thinking you mention?
Thanks,
Denise
Hi Denise,
Thanks for the kind words! I’d love to see your Diigo folder to see what other resources I can draw upon. Although I’m barely into Invent To Learn, I’d definitely say that and the Makerspace Playbook have been the most useful so far.
Now for answering the questions… my favorite part!
Yes, right now the space is heavy on technology. Our administration has shown a large interest in teaching robotics, the potential supporters are heavy on coding right now, and I am a strong believer in making and tinkering. This is my way of blending all three parts into one space, even though ideally it will all blend together into a “making culture” that will lead to students diving into whatever tools best fit their need. But for now, to show the power of making, I need to put an equal emphasis on coding and robotics (which themselves both blend together quite well).
I do definitely see the messy materials and the electronics in the same space and in fact did a very small scale version of the space yesterday and the students moved quite fluidly between the areas. And as far as the cooking and painting, I think that’s an awesome idea. My next idea is to add a planter box to the rear window in order to allow students to make through gardening. But I am trying to be completely flexible to where the students want to go. And yes, while I am going to start the making/design thinking by teaching a little of the design thinking process (from the Stanford d.school), I want it to evolve into making of whatever sort the students choose to fit their need.
Please please ask more questions… that’s how I’ll be able to make this work more powerful!
-Robert
Wow, thanks, Robert, for the quick and thorough reply! I am so excited for the students and staff who get to work in your district. Creating a culture of making is awesome, and it will transfer into making and learning of all sorts. Wonderful!
Here is my Makerspace folder. Just getting going: https://www.diigo.com/list/mrsdkrebs/Makerspace
I do appreciate the suggestion on the Makerspace Playbook. I’ll move it up my reading list!
Thanks,
Denise
Happy I happened across your blog. I’m looking forward to keeping up to date with your project! Let me know how I can help 🙂
Thanks Sharon! Your idea for the painted floor has already got me so pumped, so I’d of course welcome any other ideas you would like to share!
Nice ideas! Looking forward to hearing more about this as it progresses.
One cool idea from the Stanford FabLab@School project is to give kids ownership of the storage and display by making it easy for them to post tool tips, project ideas, photos, designs, etc right on the shelves and cabinets. That way the ideas are right with the materials, adding to the mix of “what’s possible” in the space. Everything from small dry erase boards to post it notes to QR codes that link to projects. The result is sort of like physical Instructables website created by the kids themselves.
Talk about truly owning a space… I love this! This is exactly why I posted this to share with everyone… the ideas out there are so awesome!
Thanks!!
I’ll be watching closely – would love to see what comes out of this. Great coding resource section.
Pingback: Connected Educators, Connected Education | Teaching Your Way Around the World
Robert:
Excited that Resource Area For Teaching (RAFT) will have this opportunity to collaborate with you on this project.
Some resources to add to your list:
http://scratch.mit.edu/ “Scratch” (the programming tool)
http://www.blackgirlscode.com/ “Black Girls Code” (a powerful project)
http://www.amazon.com/Design-Make-Play-Generation-Innovators/dp/041553920X “Design Make Play” (see chapter 9 for more on RAFT, also see exhibit space at the NY Hall of Science)
Greg Brown
RAFT
Robert I love the plans! I hope to start making the same kind of plans early in 2014 for a high school set to open its doors in the fall of 2014. For now I’ve been teaching, or rather doing hands-on science-related projects with students, every other Friday, and pulled off a very successful Super Science Saturday. Like you I dream of having a functioning Makerspace.
Have you seen Squishy Circuits? http://courseweb.stthomas.edu/apthomas/SquishyCircuits/index.htm It’s a great way to enable young students to play with electricity and thus learn about simple circuits. I’ve successfully repurposed old desktop power supplies and used the 12V output from them to power a table with about 6 stations for students to plug in their playdough (aka Squishy Circuit). The trick is to connect the green wire (on/off switch) to a black wire (ground) otherwise the power supply won’t turn on. One more link with good info on using squishy circuits. http://shiftingphases.com/2012/04/15/k-12-engineering-squishy-circuits-tips-and-tricks/ This was a big hit at our Super Science Saturday.
Best of luck to you!
-Will.
aka The Scibrarian
Robert – let’s chat. We have a tentative date for an International Learning Spaces Summit Oct 9-11, 2014. One of the areas of conversation will be Maker Spaces. Are you in? @finddonorth
So, um, where do I sign up to be part of this? 😉
Pingback: My year in the Chrome Omnibox | attempts at using tech effectively in our classrooms
Pingback: Making a Makerspace: The Physical Space is (relatively) Finished! | attempts at using tech effectively in our classrooms
Pingback: Digital Leadership Challenge | Adjusting Course
Pingback: Digital Leadership Challenge UPDATE | Adjusting Course
Pingback: attempts at using tech effectively in our classrooms | one educator using tech to improve our students’ lives | Teachers Tech
Pingback: Making a Makerspace: Peek Inside My Plans | Mak...
Pingback: Leadership for Today | Adjusting Course
Pingback: Making a Makerspace: Peek Inside My Plans | Dif...
Pingback: What Makes a Good Afterschool STEM Program? | MiddleWeb
Pingback: My (@pronovost’s) Top 5 Viewed Posts in 2014 #endofyearreview | attempts at using tech effectively in our classrooms
Pingback: Making a Makerspace: Peek Inside My Plans | Mak...
Pingback: Making for the littles | Invent To Learn
Pingback: Making a Makerspace: Peek Inside My Plans | Mak...
Hey this some good stuff.